OpenFlow enables network controllers to determine the path of network packets across a network of switches.
Controllers are different from switches. Separation of control from the forwarding allows for more sophisticated traffic management than is feasible using access control lists (ACLs) and routing protocols.
Also, OpenFlow allows switches from different vendors — often each with their own proprietary interfaces and scripting languages — to be managed remotely using a single, open protocol. The protocol’s inventors consider OpenFlow an enabler of software-defined networking (SDN).
OpenFlow allows remote administration of a layer 3 switch’s packet forwarding tables, by adding, modifying, and removing packet matching rules and actions.
With this solution, you can make routing decisions periodically or ad hoc by the controller after which they can be translated into rules and actions with a configurable lifespan.
OpenFlow Capabilities
Later on, they can be deployed to a switch’s flow table, leaving the actual forwarding of matched packets to the switch at wire speed for the duration of those rules. Packets that are unmatched by the switch can be forwarded to the controller.
The controller can then decide to modify existing flow table rules on one or more switches or to deploy new rules, to prevent a structural flow of traffic between switch and controller.
It could even decide to forward the traffic itself, provided that it has told the switch to forward entire packets instead of just their header.
The OpenFlow protocol is layered on top of the Transmission Control Protocol (TCP) and prescribes the use of Transport Layer Security (TLS). Controllers should listen on TCP port 6653 for switches that want to set up a connection. Earlier versions of the OpenFlow protocol unofficially used port 6633.
Openflow usage in OpenDaylight is based on the OpenFlow plugin project. In order to connect OpenFlow devices to the lighty.io controller, we had to migrate the OpenFlow plugin project.
The Openflow project and its parts are initialized using blueprints in vanilla OpenDaylight, so to get the project up in lighty.io we have to initialize these explicitly. In addition, the OpenFlow plugin has a direct link to the Karaf bundle context and so we have to re-implement the OpenFlow plugin configuration part.
Although this sounds like a lot of work, it is still very straightforward.
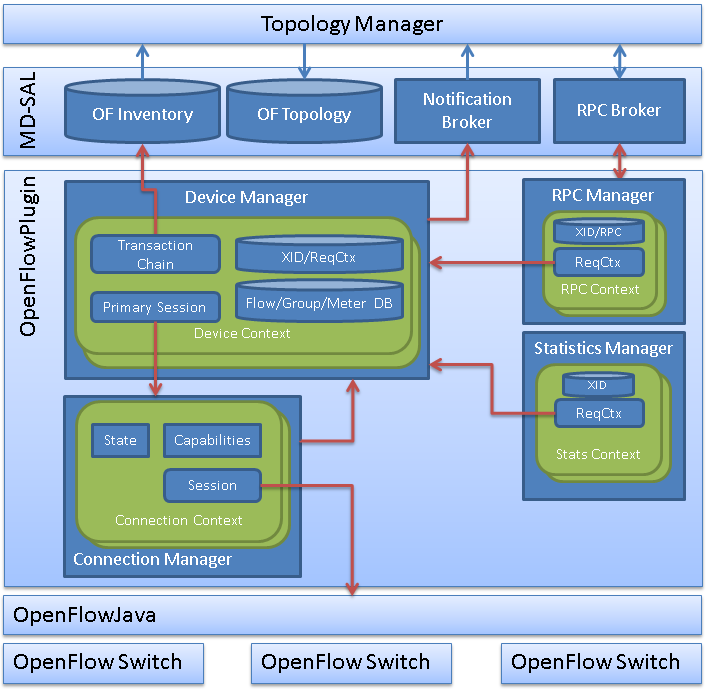
Openflowplugin detail architecture
Blueprints in OpenFlow plugin
    <reference id="defaultSwitchConnProvider" interface="org.opendaylight.openflowjava.protocol.spi.connection.SwitchConnectionProvider"
               odl:type="openflow-switch-connection-provider-default-impl"/>
    <reference id="legacySwitchConnProvider" interface="org.opendaylight.openflowjava.protocol.spi.connection.SwitchConnectionProvider"
               odl:type="openflow-switch-connection-provider-legacy-impl"/>
    <reference id="openflowPluginProviderFactory"
               interface="org.opendaylight.openflowplugin.api.openflow.OpenFlowPluginProviderFactory"/>
    <reference id="configurationServiceFactory"
               interface="org.opendaylight.openflowplugin.api.openflow.configuration.ConfigurationServiceFactory"/>
    <reference id="mastershipChangeServiceManager"
               interface="org.opendaylight.openflowplugin.api.openflow.mastership.MastershipChangeServiceManager"/>
    <odl:clustered-app-config id="openflowProviderConfig"
                              binding-class="org.opendaylight.yang.gen.v1.urn.opendaylight.params.xml.ns.yang.openflow.provider.config.rev160510.OpenflowProviderConfig"/>
    <bean id="configurationService"
          factory-ref="configurationServiceFactory"
          factory-method="newInstance"
          destroy-method="close">
        <argument ref="openflowProviderConfig" />
        <argument ref="blueprintBundleContext" />
        <cm:managed-properties persistent-id="org.opendaylight.openflowplugin"
                               update-strategy="component-managed"
                               update-method="update"/>
    </bean>
    <service ref="configurationService" interface="org.opendaylight.openflowplugin.api.openflow.configuration.ConfigurationService"/>
    <bean id="openflowPluginProvider"
          factory-ref="openflowPluginProviderFactory"
          factory-method="newInstance"
          destroy-method="close">
        <argument ref="configurationService"/>
        <argument ref="dataBroker"/>
        <argument ref="rpcRegistry"/>
        <argument ref="notificationPublishService"/>
        <argument ref="entityOwnershipService"/>
        <argument>
            <list>
                <ref component-id="defaultSwitchConnProvider"/>
                <ref component-id="legacySwitchConnProvider"/>
           </list>
        </argument>
        <argument ref="clusterSingletonServiceProvider"/>
        <argument ref="mastershipChangeServiceManager"/>
    </bean>
    <service ref="openflowPluginProvider" odl:type="openflow-plugin-provider-impl">

            org.opendaylight.openflowplugin.api.openflow.OpenFlowPluginProvider
            org.opendaylight.openflowplugin.extension.api.OpenFlowPluginExtensionRegistratorProvider

    </service>
</blueprint>
As you can see, the OpenFlow plugin uses OpenDaylight Controller dependencies and classes, like Entityownership, ClusterSingletonService, DataBroker, and NotificationService.
The Open Daylight Controller supports the OpenFlow protocol. The Controller architecture supports both the Hybrid Switch model as well as the classic OpenFlow model of having a fully centralized Control Plane. Service using bundle context
/**
 * Factory for creating ConfigurationService instances.
 */
public interface ConfigurationServiceFactory {
    ConfigurationService newInstance(OpenflowProviderConfig providerConfig,
                                     BundleContext bundleContext);
}
The OpenDaylight OpenFlow plugin implementation of this interface is using the Karaf bundle context, which we don’t have in lighty.io. Therefore, we need to re-implement it in lighty.io.
Configuration of OpenFlow plugin w/ lighty.io
OpenFlow plugin uses a separate configuration for each plugin configuration and separate configuration for switch connectors. In this lighty.io example use case we’ve put it together and here you can see an example JSON file to configure OpenFlow plugin.
{
  "openflow": {
    "isStatisticsPollingOn": true,
    "barrierCountLimit": "1234",
    "barrierIntervalTimeoutLimit": "3000",
    "basicTimerDelay": "2690",
    "echoReplyTimeout": "4000",
    "globalNotificationQuota": "9000",
    "maximumTimerDelay": "3679",
    "rpcRequestsQuota": "2500",
    "threadPoolMaxThreads": "1000",
    "threadPoolMinThreads": "3",
    "threadPoolTimeout": "60",
    "enableFlowRemovedNotification": "true",
    "isStatisticsRpcEnabled": "false",
    "skipTableFeatures": "true",
    "switchFeaturesMandatory": "false",
    "useSingleLayerSerialization": "true",
    "switchConfig": {
      "instanceName":"openflow-switch-connection-provider-default-impl",
      "port":1234,
      "transportProtocol":0,
      "useBarrier":true,
      "switchIdleTimeout":15001,
      "keystore":"configuration/ssl/ctl.jks",
      "keystoreType":0,
      "keystorePathType":1,
      "keystorePassword":"opendaylight",
      "truststore":"configuration/ssl/truststore.jks",
      "truststoreType":0,
      "truststorePathType":1,
      "truststorePassword":"opendaylight",
      "certificatePassword":"opendaylight"
    }
  }
}
Openflowplugin example application in lighty.io
We managed to create an example application using lighty.io. It might be a helping hand to those who wish to use OpenFlow their lighty.io controllers.
The structure of the example is the same as in the other examples: start the necessary dependencies such as Controller or Restconf. We need Restconf in this example only to be able to manage the resulting controller using operations like a post or to get flow and device information.
Program core structure:
//1. initialize and start Lighty controller (MD-SAL, Controller, YangTools, Akka)
final LightyControllerBuilder lightyControllerBuilder = new LightyControllerBuilder();
final LightyController lightyController = lightyControllerBuilder.from(controllerConfiguration).build();
lightyController.start().get();
//2. start Restconf server
final RestconfBuilder restconfBuilder = new RestconfBuilder();
final LightyModule restconf = restconfBuilder.from(RestconfConfigUtil
        .getRestConfConfiguration(restConfConfiguration, lightyController.getServices()))
        .build();
restconf.start();
//3. start openflow SBP
final OpenflowSouthboundPlugin plugin;
plugin = new OpenflowSouthboundPluginBuilder()
        .from(configuration, lightyController.getServices())
        .build();
plugin.start();
Controller start and device connection
After a build of a lighty-restconf-ofp-app in lighty.io, you can unzip the created file into a separate folder and run the controller with start script.
INFO [main] (Main.java:100) - Lighty and OFP started in 7649.765ms
The above logline tells us, that the controller and OpenFlow plugin are running. Now we can join an OpenFlow device using Mininet.
sudo mn --controller=remote,ip=127.0.0.1 --topo=tree,1 --switch ovsk,protocols=OpenFlow13
We can see in the log above, that the device openflow:1 is connected and mastered by the controller.
INFO [nioEventLoopGroup-10-2] (ContextChainHolderImpl.java:225) - Role MASTER was granted to device openflow:1
Post Flow / Check Device in the operational datastore
The last thing is to set a flow on the connected device (opeflow:1) and check if it is properly installed.
POST this flow:
curl -X POST -k -H 'Content-Type: application/xml' -H 'Authorization: Basic YWRtaW46YWRtaW4=' -i https://localhost:8888/restconf/operations/sal-flow:add-flow --data 'false /inv:nodes/inv:node[inv:id="openflow:1"] 55 SEND_FLOW_REM 0 0 false 2048 10.0.10.2/32 0 0 INPORT 0 false 0 </input>
And check the device:
curl -X GET -k -H 'Authorization: Basic YWRtaW46YWRtaW4=' -i 'https://localhost:8888/restconf/data/opendaylight-inventory:nodes/node=openflow%3A1/table=0?content=nonconfig'
After all this, you have to create proof that the device is connected with the newly created lighty.io controller using the OpenDaylight OpenFlow plugin.
{
  "flow-node-inventory:table": [{
    "id": 0,
    "flow": [{
      "id": "#UF$TABLE*0-1",
      "cookie_mask": 0,
      "priority": 0,
      "table_id": 0,
      "opendaylight-flow-statistics:flow-statistics": {
        "duration": {
          "second": 20,
          "nanosecond": 196000000
        },
        "byte-count": 0,
        "packet-count": 0
      },
      "match": {
        "ipv4-destination": "10.0.10.2/32",
        "ethernet-match": {
          "ethernet-type": {
            "type": 2048
          }
        }
      },
      "flags": "SEND_FLOW_REM",
      "idle-timeout": 0,
      "hard-timeout": 0,
      "cookie": 55,
      "instructions": {
        "instruction": [{
          "order": 0,
          "apply-actions": {
            "action": [{
              "order": 0,
              "output-action": {
                "output-node-connector": "IN_PORT",
                "max-length": 0
              }
            }]
          }
        }]
      }
    }]
  }]
}
Congratulations! You have successfully experimented with the OpenFlow plugin in lighty.io!