lighty.io components are versatile and reusable in different scenarios. Let’s take a closer look at the lighty-netconf-device java library.
This lighty.io component represents a fully programmable NETCONF communication stack, which can be integrated with hardware to achieve interoperability with lighty.io NETCONF – RESTCONF controllers.
The lighty-netconf-device library implements a server for RFC 6241 and provides related services like Datastore, RPC handling, and NETCONF protocol operations.
Raspberry Pi is a very popular platform for hardware prototyping. Raspberry Pi 3 utilizes Broadcom ARM v7 BCM2835 SoC.
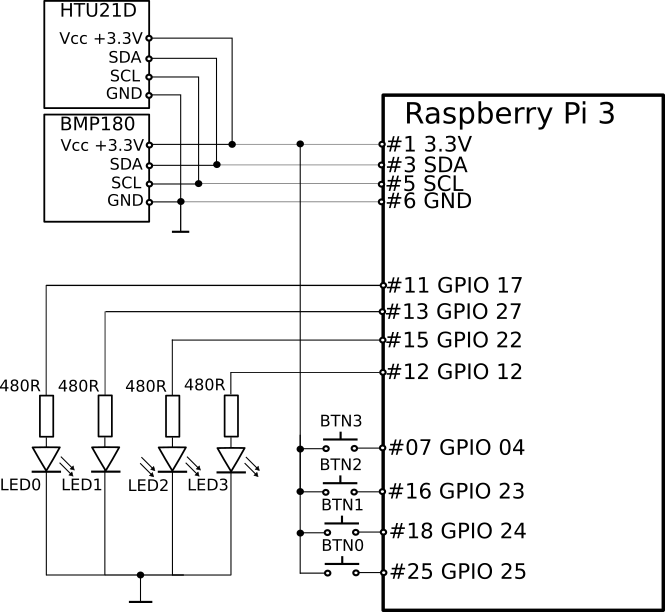
In this example, we will build a simple device equipped with:
- 4 LED state indicators
- 4 buttons and sensors for measuring
- temperature
- relative humidity
- atmospheric pressure.
Device schematics and wiring is described on the picture below.
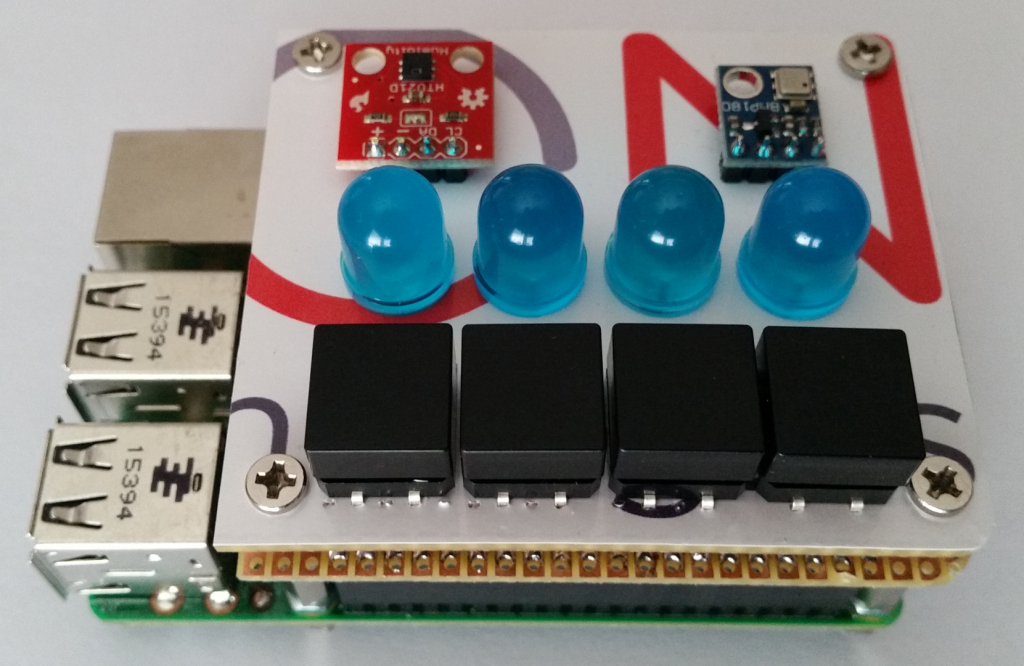
Hardware components
- Raspberry PI 3 Model B v1.2
- BMP-180 I2C Bosch temperature and atmospheric pressure sensor
- HTU-21D I2C temperature and relative humidity sensor
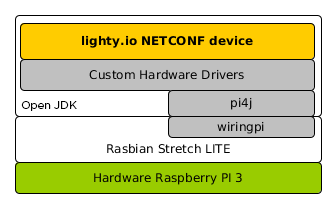
Software Stack
The software stack used on the Raspberry PI device consists of following components:
The next step is to create a YANG model of the device:
module rpi-device {
    yang-version 1.1;
    namespace "urn:tech.pantheon.netconfdevice.rpid";
    prefix "dc";
    organization "Pantheon Technologies";
    description
        "This module represents API to Raspberry-Pi test device";
    revision "2018-02-25" {
        description
            "Initial revision";
    }
    grouping led-data {
        leaf led-id {
             type int8 {
                  range "0 .. 3";
             }
             description "Unique LED port ID. Allowed values are 0,1,2,3.";
        }
        leaf led-status {
             type boolean;
             description "LED port status true=high/on, false=low/off.";
        }
    }
    container RpiDevice {
        description "Data model of RPis test device.";
        leaf device-name {
            type string;
            description "Name of this device.";
        }
        leaf temperature {
            type decimal64 {
                 fraction-digits 3;
                 range "-200 .. 200";
            }
            config false;
            description "Ambient temperature in Celsius degree [C].";
        }
        leaf relative-humidity {
            type decimal64 {
                 fraction-digits 3;
                 range "0 .. 100";
            }
            config false;
            description "Ambient relative humidity in percentage [%].";
        }
        leaf atmospheric-pressure {
            type decimal64 {
                 fraction-digits 3;
                 range "0 .. 1000000";
            }
            config false;
            description "Atmospheric Pressure in pascals [Pa].";
        }
        list led-indicators {
             config false;
             description "0-3 LED port indicator list";
             key "led-id";
             uses led-data;
        }
    }
    rpc set-led {
        description "set LED port status high/on or low/off.";
        input {
           uses led-data;
        }
        output {
           uses led-data;
        }
    }
}
The last step is to implement the Java code, which initializes the NETCONF stack, datastore, and hardware bindings.
These interact with the sensors and IO ports of Raspberry PI. Example below starts NETCONF interface on port 17830. The rpi-device@2018-02-25.yang YANG model is used and the device Datastore is initialized with data from configuration.
Hardware drivers for sensors and IO ports are injected using constructors. The main class, which starts the NETCONF device application, looks like this:
public static void main(String[] args) {
    //1. Load models from classpath
    Set<YangModuleInfo> rpiModules = ModelUtils.getModelsFromClasspath(ModuleId.from("rpi-device", "2018-02-25"));
    //2. Initialize DataStores
    InputStream initialDataConfig = Main.class.getResourceAsStream("/initial-config.xml");
    InputStream initialDataOperational = Main.class.getResourceAsStream("/initial-operational.xml");
    //3. Initialize hardware driver
    HardwareDriver hardwareDriver = HardwareDriverFactory.create();
    //4. Initialize RPCs
    RpiDeviceServiceImpl rpiDeviceService = new RpiDeviceServiceImpl(hardwareDriver);
    SetLedProcessor setLedProcessor = new SetLedProcessor(rpiDeviceService);
    //5. Initialize Netconf device
    NetconfDevice netconfDevice = new NetconfDeviceBuilder()
            .setCredentials("admin", "admin")
            .setBindingPort(17830)
            .setInitialConfigurationData(initialDataConfig)
            .setInitialOperationalData(initialDataOperational)
            .withModels(rpiModules)
            .withDefaultRequestProcessors()
            .withRequestProcessor(setLedProcessor)
            .withDefaultCapabilities()
            .build();
    netconfDevice.start();
    //6. Initialize hardware scanner
    DataStoreService dataStoreService = new DataStoreService(netconfDevice.getNetconfDeviceServices().getDataBroker());
    hardwareDriver.setListener(dataStoreService);
    HardwareScanner hardwareScanner = new HardwareScanner(dataStoreService, hardwareDriver, TimeUnit.SECONDS, 5);
    new Thread(hardwareScanner).start();
}
Now we have NETCONF device up and running on network, let’s use lighty-netconf-restconf-app as a SDN controller to manage this device.
This lighty.io based controller uses OpenDaylight core components, NETCONF south-bound plugin and Pantheon’s RESTCONF RFC8040 implementation as a north-bound plugin. Whole SDN architecture looks like this:

Now we can use RESTCONF to connect and access Raspberry PI NETCONF device in 4 easy steps:
- Connect the device to the SDN controller
POST https://localhost:8888/restconf/data/network-topology:network-topology/topology=topology-netconf
  {
    "netconf-topology:node" :[ {
      "node-id": "rpi-device",
      "host": "192.68.0.102",
      "port": 17830,
      "username": "admin",
      "password": "admin",
      "tcp-only": false,
      "keepalive-delay": 0,
      "netconf-node-configuration:schemaless": false
      }
    ]
  }
reply 201
- Check the device connection status
reply 200:
{
    "topology": [
        {
            "topology-id": "topology-netconf",
            "node": [
                {
                    "node-id": "toaster-device",
                    "netconf-node-topology:available-capabilities": {
                        "available-capability": [
                            {
                                "capability": "urn:ietf:params:netconf:base:1.1",
                                "capability-origin": "device-advertised"
                            },
                            {
                                "capability": "urn:ietf:params:netconf:base:1.0",
                                "capability-origin": "device-advertised"
                            },
                            {
                                "capability": "urn:ietf:params:netconf:capability:candidate:1.0",
                                "capability-origin": "device-advertised"
                            },
                            {
                                "capability": "(urn:tech.pantheon.netconfdevice.rpid?revision=2018-02-25)rpi-device",
                                "capability-origin": "device-advertised"
                            }
                        ]
                    },
                    "netconf-node-topology:host": "127.0.0.1",
                    "netconf-node-topology:unavailable-capabilities": {},
                    "netconf-node-topology:connection-status": "connected",
                    "netconf-node-topology:port": 17830
                }
            ]
        }
    ]
}
- Access the device data
GET https://localhost:8888/restconf/data/network-topology:network-topology/topology=topology-netconf/node=rpi-device/yang-ext:mount/rpi-device:RpiDevice
reply 200
{
    "RpiDevice": {
        "atmospheric-pressure": 111111.109375,
        "device-name": "RPi device 01",
        "led-indicators": [
            {
                "led-id": 0,
                "led-status": true
            },
            {
                "led-id": 1,
                "led-status": false
            },
            {
                "led-id": 2,
                "led-status": false
            },
            {
                "led-id": 3,
                "led-status": false
            }
        ],
        "temperature": 22.2199993133544921875,
        "relative-humidity": 44.439998626708984375
    }
}
- Set the device LED port status
POST https://localhost:8888/restconf/operations/network-topology:network-topology/topology=topology-netconf/node=rpi-device/yang-ext:mount/rpi-device:set-led
{
	"input": {
		"led-id": 0,
		"led-status": true
	}
}
reply 200:
{
    "output": {
        "led-status": true,
        "led-id": 0
    }
}
This example shows you, how easily you can create your own YANG model, to be able to manage your embedded devices with lighty.io SDN controller.
If you don’t dare to write your own YANG models, you can search for opensource models from standard bodies like IETF, or Openconfig.net.
Juraj Veverka