- Do you need an SDN controller that you can run quickly?
- Is security one of your concerns?
- Do you need to divide the users into groups & restrict their capabilities for certain tasks?
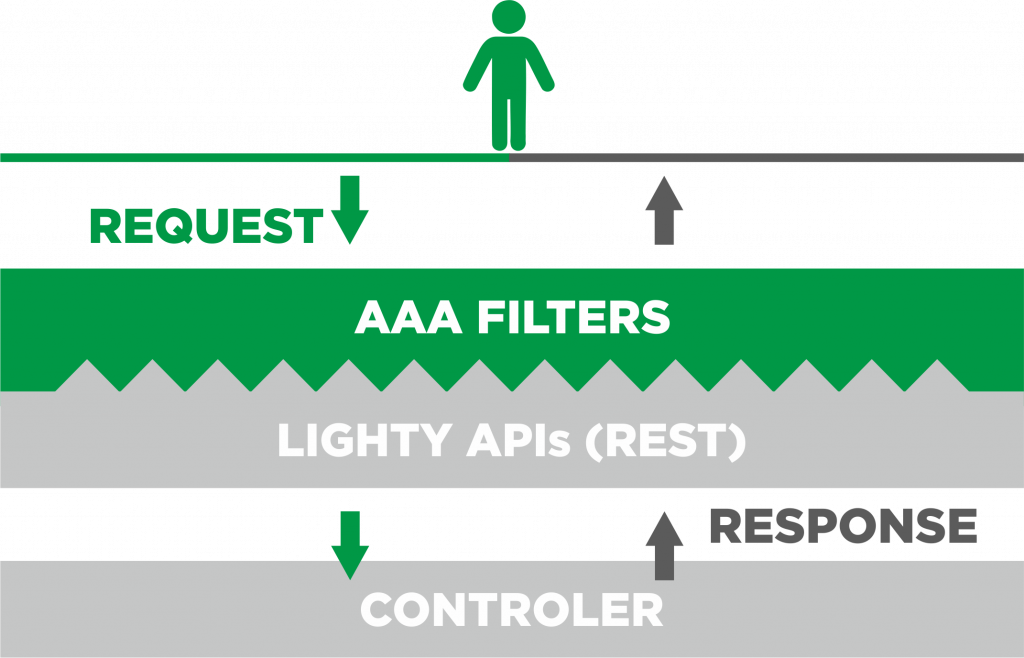
With lighty.io AAA, you can create password-protected users. You can assign a role and a domain and define its capabilities. You can restrict users to a certain method or permit them to access data only on a specific path.
Use this dependency to give lighty.io AAA a try:
   io.lighty.aaa
   lighty-aaa
   8.0.0-SNAPSHOT
To start this module, simply create a lighty AAA object and call a start method. You can use the shutdown method to stop this module. Once the lighty controller & RestConf with lighty AAA are up and running, you may start to create new users, roles, and domains.
You can assign roles to the users, create policies for, and grant permissions to the users.
How to create a user
Use this POST request to create a user:
path:
with body:
{
    "name": "u1",
    "description": "just another new user",
    "enabled": 1,
    "email": "u1@sdn.tech",
    "password": "foo",
    "salt": "foo",
    "domainid": "sdn"
}
lighty will automatically generate a user id for you and save it into the database. The expected response should be “201 Created“:
{
    "userid": "u1@sdn",
    "name": "u1",
    "description": "just another new user",
    "enabled": 1,
    "email": "u1@sdn.tech",
    "password": "**********",
    "salt": "**********",
    "domainid": "sdn"
}
How to list users
This GET request should bring up a list of users with their information:
path:
Now we expect a response with a list of users with their information, “200 OK”.
{
    "users": [
        {
            "userid": "admin@sdn",
            "name": "admin",
            "description": "admin user",
            "enabled": 1,
            "email": "",
            "password": "**********",
            "salt": "**********",
            "domainid": "sdn"
        },
        {
            "userid": "u1@sdn",
            "name": "u1",
            "description": "just another new user",
            "enabled": 1,
            "email": "u1@sdn.tech",
            "password": "**********",
            "salt": "**********",
            "domainid": "sdn"
        }
    ]
}
If we use the credentials of this newly created user, we would receive the response ‘unauthorized‘. To resolve this issue, we need to create a “grant” to the user. This means that we have to assign a role to the user.
How to create a “grant”
Use this POST request to create a grant:
path:
with the body:
{
    "roleid": ""
}
lighty will process this request, by writing new data to grant a table of the database with specific user-id and role-id under the chosen domain. The expected response should be the following: 201 Created
{
    "grantid": "@@",
    "domainid": "",
    "userid": "",
    "roleid": ""
}
How to list roles
This GET request will bring up a list of roles with their information.
path:
Now we expect a response with a list of roles with their information, “200 OK”.
{
    "roles": [
        {
            "roleid": "admin@sdn",
            "name": "admin",
            "description": "a role for admins",
            "domainid": "sdn"
        },
        {
            "roleid": "user@sdn",
            "name": "user",
            "description": "a role for users",
            "domainid": "sdn"
        }
    ]
}
This is perfect if we need to divide our users into an admin role which would have the capability to create, remove, and update users. The user role would have the capability to do operations on datastore.
But what if we need to create more roles? Such as a role where the user can only read data or a role where the user can do operations only on a specific path. To do that, we need to follow these two steps:
1: Create a new role
2: Define a policy for the role
How to create a role
Use this POST request to create a role:´
path:
with body:
{
    "name" : "read-only",
    "description": "This role is for users that have read only rights",
    "domainid": "sdn"
}
Lighty will write this role to the roles table in the database so it can be used to assign this role to the user or to update policy for this role. When creating a role we expect the following response: 201 Created.
{
    "roleid": "read-only@sdn",
    "name": "read-only",
    "description": "This role is for users that have read only rights",
    "domainid": "sdn"
}
How to define a policy for a specific role
The meaning of defining a policy to a role is to manage what the given role can do. By defining a policy you can restrict a role; to use specific HTTP methods or access data only under a specific list or container.
Create a POST request to define a policy:
path:
with body:
{
    "policies": [
      {
        "resource": "/restconf/modules/**",
        "permissions": [
          {
            "role": "read-only",
            "actions": [
             "get"
            ]
          }
        ],
        "description": "read only policy on restconf/modules list"
      }
    ]
}
After this request, all the users who have assigned the role of “read-only”, will be able to do only GET request on path
How to list policies
Use the following GET request to see all the policies which are created:
path:
Now we expect a response with a list of policies with their information:
200 OK
{
    "policies": {
        "policies": [
            {
                "resource": "/restconf/modules/**",
                "permissions": [
                    {
                        "role": "read-only",
                        "actions": [
                            "get"
                        ]
                    }
                ],
                "description": "read only policy on restconf/modules list"
            },
            {
                "resource": "/restconf/**",
                "permissions": [
                    {
                        "role": "users",
                        "actions": [
                            "get"
                        ]
                    }
                ],
                "description": "read only policy on restconf list"
            }
        ]
    }
}
How to create a domain
Use the following POST request to create a new domain:
with body:
{
    "name" : "",
    "description": "",
    "enabled": true
}
Lighty AAA will create a domain id and this domain will be written into the domains table of the database. The expected response should be the following:
{
    "domainid": "",
    "name": "",
    "description": "",
    "enabled": true
}
How to list domains
We can use the following GET request to see all the domains that are created:
path:
Now we expect a response with a list of domains with their information:
200 OK
{
    "domains": [
        {
            "domainid": "",
            "name": "",
            "description": "",
            "enabled": true
        },
        {
            "domainid": "",
            "name": "",
            "description": "",
            "enabled": false
        }
    ]
}
How to authenticate
There are two ways to authenticate the user:
1: HTTP basic authentication
2: oauth2 to generate tokens
Method 1: HTTP basic authentication
For this, we need a username and password separated by column encrypted using base64 encryption. The resulting encryption can be used as a header with key “Authorization” and value “Basic”.
Method 2: Oauth2 authentication
The second option is to generate a Bearer token. To generate a token, create a POST request:
path: /
Content-Type : application/x-www-form-urlencoded
with body:
grant_type=password&username=&pard= &scope=
Now, you should be ready to use Authentication, Authorization & Accounting with lighty.io.